This guide shows how to install a roof ladder that meets OSHA 1910.23 and EN ISO 14122-4. We are a factory-direct steel ladder manufacturer, ISO 9001:2015 certified since 2003, and our crews fit these units on real export jobs. The five steps below come straight from our installation engineers. Skip the generic checklist. Get the anchor load, the rung spacing, and the corrosion protection right, and the ladder will outlast the roof.
/images/home_industry_04_installation.webp1. Tools and Preparation
Get the kit ready before anyone goes near the edge.
- Cordless drill and the correct masonry or steel bit for the substrate - M12 anchor bolts, stainless or hot-dip galvanized - Calibrated torque wrench - Spirit level and chalk line - Full-body harness, lifeline, and edge protection
Check what you are fixing into first. Concrete, a steel purlin, and timber each need a different anchor. Measure the full run, then mark every fixing point before you lift a single section. In our factory we pre-mark and dry-fit on the ground; it saves an hour of re-drilling on the roof.
Standard material is Q235B carbon steel, hot-dip galvanized. For coastal or chemical sites we switch to SS304, or SS316 where salt exposure is heavy.
2. Anchoring (kN)
This is the step most installs get wrong.
OSHA 1910.23 and EN ISO 14122-4 both require fixed access ladders to carry a defined point load at every anchor. Each top bracket on our roof ladders is designed to hold 6 kN, which gives a 2:1 margin over the 3 kN minimum we test to. Use M12 through-bolts and torque them to the spec on the drawing, not by feel.
We sample pull-test every batch to failure on our own rig, and we keep the load test data on file. SGS-witnessed pull tests are available when a client needs third-party proof.
3. Spacing (mm)
Spacing is fixed by the standard, not by preference.
| Dimension | Value | Reference | |---|---|---| | Rung spacing (centres) | 250–300 mm | EN ISO 14122-4 | | Standoff from roof surface | 150–200 mm | grip clearance | | Bracket spacing (max) | 1500 mm | load span | | Clear ladder width | 400 mm | EN ISO 14122-4 |
Keep the rung spacing even from the first rung to the last. An uneven top rung is a trip point, and inspectors flag it fast.
/images/home_project_06_install_detail.webp4. Anti-Corrosion
A roof ladder lives in rain, frost, and UV for decades. Protect it.
Hot-dip galvanizing gives a coating of 85–140 μm, well above the 85 μm floor most specs ask for. We coat after fabrication, never before, so every cut edge and drilled hole stays sealed. When you drill on site you break that layer, so brush zinc-rich paint over each scratched zone the same day. For SS304 or SS316 units, passivate any ground welds.
5. Safety Check
Walk the finished ladder before you sign off.
- Torque-check every anchor bolt against the spec - Confirm each rung sits level - Pull-test the top anchors by hand load - Fit a safety hoop or cage where the climb runs past the height your local rule sets - Clear the climbing zone of cable trays and pipe runs
For permanent access ladders in the UK market, cross-check the layout against BS 4211. Every order ships with the documents that prove the build: material certificates, weld inspection reports, and load test data. No middleman sits between you and the factory, so the pricing and the paperwork come direct. Clients are welcome to audit the line in person.
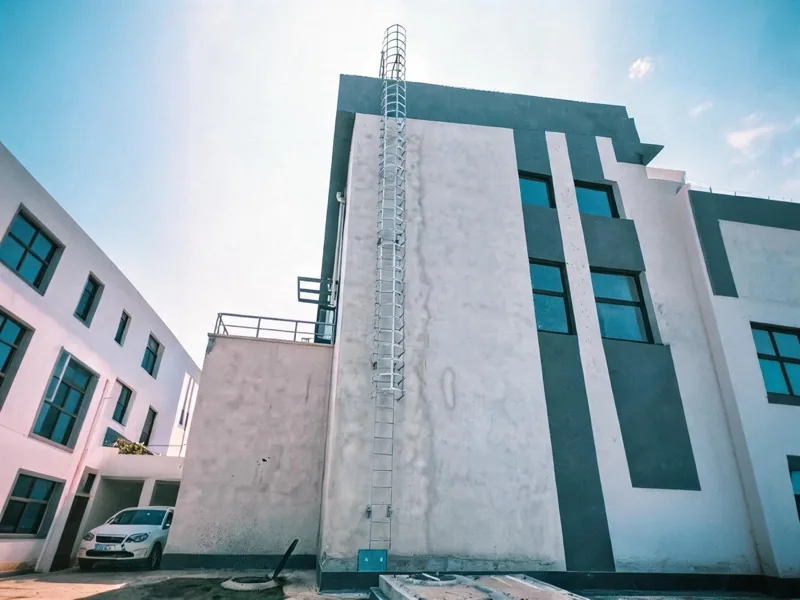
Project example
We export roof access ladders to 50+ countries.
For load tables, hoop options, and the full specification, see our [roof ladder](/roof-ladder/) hub. If you need a permanently mounted unit with brackets pre-drilled to your roof pitch, our [Fixed Roof Access ladders](/products/fixed-roof-access/) are built to order.